Table of Contents
- Prerequisites
- Maven
- Eclipse
- Installing Plugins
- Selecting the SVN implementation
- Setting up the Maven SVN integration
- Sysdeo Tomcat Plug-in
- Groovy Plug-in (optional)
- Preparing your workspace
- Eclipse settings
- Comment format:
- Code format settings:
- Tomcat plug-in:
- Adding the SVN repositories
- Checking out the code
- Building KnowWE
- Create local preferences for JSPWiki
- Package KnowWE-Resources
- Create a run configuration for building the wiki
- Updating the Tomcat context
- Starting KnowWE
- Troubleshooting
- Compile errors after first build
- ClassCastException on startup
Prerequisites#
- Java Development Kit (JDK)
 , Version 1.6.15 or later
Not Java 7! - Eclipse 3.7 "Indigo" IDE for Java EE Developers
Please make sure to get the Java EE edition.
You can also use the new Eclipse 4.2, although it is less tested with the rest of the configuration. - Apache Tomcat 6
Use the "Binary Distribution" - "Core" - .tar.gz or .zip. Do not use the installer. Do not use Tomcat 7
Maven#
Go to http://maven.apache.org/download.html and download the latest version of Maven 2. At the time of this writing this is 2.2.1. Unpack it somewhere on your system.
Do not download Maven 3!
Eclipse#
To make Eclipse work with Subversion, Tomcat and Maven, you will need a few additional plug-ins.
Installing Plugins#
In the main menu, navigate to Help -> Install new software. In the Work with field, select Indigo - http://download.eclipse.org/releases/indigo. Wait for the list of available software to be retrieved, then select the following plug-ins to install:- Collaboration
- m2e - Maven Integration for Eclipse
- Subversive SVN Team Provider (Incubation)
Click Next, accept the licenses, and finish the installation. Restart Eclipse when you are asked to.
Selecting the SVN implementation#
After restarting Eclipse, click on Window -> Open Perspective -> SVN Repository Exploring. A dialog window will be opened asking you to select an SVN connector implementation. Select SVNKit 1.3.5 (or the latest available SVNKit version) and finish the installation wizard.
You need to accept installing unsigned software, and restart Eclipse again when asked.
Setting up the Maven SVN integration#
Again, go to Help -> Install new software. Click the Add.. button in the top right corner. In the dialog window, enter the following URL into the Location field:
For Eclipse "Juno":
Hit OK, then select the following software to be installed:
- Maven SCM Handler for Subversive
- Maven SCM Handler for Subversive
Like before, finish the wizard and this time close Eclipse (either click Not now and exit Eclipse, or let it restart and exit from there).
Sysdeo Tomcat Plug-in#
The Sysdeo Tomcat Plug-in allows you to start Tomcat directly from within Eclipse.
You can find it at http://www.eclipsetotale.com/tomcatPlugin.html.
To perform the installation, download the .zip file provided at the author's homepage and unpack it into the plugins/ folder inside your Eclipse installation.
The KnowWE-App project is preconfigured for use with this plug-in.
Groovy Plug-in (optional)#
You can skip this plugin if you do not use the plug-ins using Groovy (e.g., Refactoring, WISEC, CI,...).
To install the plugin, you need to add a new Software Update Site in Eclipse:
In the main menu, navigate to Help -> Install new software. In the dialog, click Add... and enter the following URL into the Location text box:
For Eclipse 3.6
For Eclipse 3.5
Then, you just have to select and install the "Groovy-Eclipse Feature" which you can find under
Currently, Groovy is only needed for the Project "KnowWE-Plugin-Refactoring". It is highly recommended to install this plugin because otherwise, Eclipse will show errors.
Alternatively, close the project. This is not recommended, because if you change something on the core projects, you will forget eventual changes which concern also the refactoring plugin.
In either case, Maven is able to compile the refactoring plugin and you also will be able to run its maven tests, with or without having installed the Groovy-Plugin for Eclipse.
Preparing your workspace#
Eclipse settings#
Start arguments:
Maven needs Eclipse to run in a JDK, not in a JRE. Start Eclipse with the -vm parameter, for example:
"C:\Program Files\eclipse\eclipse.exe" -vm "C:\Program Files\Java\jdk1.6.0_17\bin\javaw.exe"
You can find the following Eclipse settings in the main menu at Window -> Preferences.
Maven -> Installations. Click on Add... and select the path where you unpacked Maven. Be sure that your external Maven version is checked.
Encoding: General -> Workspace -> Text file encoding: "UTF-8"
Disable certain compiler errors: Java -> Compiler -> Errors/Warnings -> Deprecated and restricted API -> Forbidden reference: "Warning"
 |
Comment format:#
Get the codetemplates.xml attached to this page and import it: Java -> Code Style -> Code Templates
Enable: Automatically add comments for new methods and types
(If your login name is not meaningful, you have to change the comment template for Type, as your login name is used as author name)
Code format settings:#
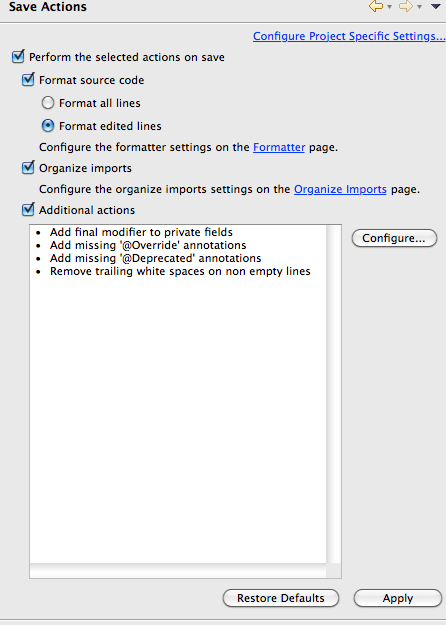
Get the code_conventions.xml attached to this page and import it: Java -> Code Style -> FormatterTo enable automatic formatting, certain actions have to be carried out on saving: Java -> Editor -> Save Actions
The screenshot on the right shows the actions, that have to be activated.
Tomcat plug-in: #
Tomcat -> Tomcat Version: Select your Tomcat version hereTomcat -> Tomcat Home: Choose the directory where you unpacked the Tomcat zip
Tomcat -> Context declaration mode: "Context files" (do not select server.xml!)
Tomcat -> JVM Settings -> JRE: check that the correct JRE is selected
optional: Set larger heap size for tomcat:
Window -> Preferences -> Tomcat -> JVM Settings -> add to JVM parameters -> set for example: -Xms1g -Xmx1g
Read for your exact personal settings: http://javahowto.blogspot.com/2006/06/6-common-errors-in-setting-java-heap.html
recommended: Set Tomcat to use UTF-8 (necessary for special characters like german umlauts in page names for example):
You have to edit server.xml of Tomcat (is in the conf-directory of Tomcat). Please add to
<Connector port="8080"
               maxThreads="150" minSpareThreads="25" maxSpareThreads="75"
               enableLookups="false" redirectPort="8443" acceptCount="100"
               debug="0" connectionTimeout="20000"
               disableUploadTimeout="true"/>
the term URIEncoding="UTF-8".
It should look like that:
<Connector port="8080"
               maxThreads="150" minSpareThreads="25" maxSpareThreads="75"
               enableLookups="false" redirectPort="8443" acceptCount="100"
               debug="0" connectionTimeout="20000"
               disableUploadTimeout="true"
               URIEncoding="UTF-8"/>
Further information: http://www.jspwiki.org/wiki/BugProblemsWithGermanUmlaute
Adding the SVN repositories#
Window -> Open perspective -> Other… -> SVN Repository Exploring.Repeat the following step for each of the listed repository URIs:
In the SVN Repositories view, perform a right click, select New -> Repository Location...
Read/write access (account necessary):
https://isci.informatik.uni-wuerzburg.de/svn/d3web-KnowWE
https://isci.informatik.uni-wuerzburg.de/svn/Research
Anonymous access (read only):
https://isci.informatik.uni-wuerzburg.de/anonsvn/d3web-KnowWE
https://isci.informatik.uni-wuerzburg.de/anonsvn/Research
Checking out the code#
Select the three main projects (d3web, d3web-KnowWE, and Research) as well as KnowWE-App from inside the trunks of the three repositories. They are in the trunk/ folders respectively. Use CTRL or Cmd to be able to select multiple projects. Right click one of the projects and select Check out as Maven Project… and click Finish.Building KnowWE#
Create local preferences for JSPWiki#
Copy KnowWE-App/src/resources/local/WEB-INF/jspwiki.properties.default to jspwiki.properties in the same directory. Do not rename it in Eclipse.In jspwiki.properties, edit the settings for your local environment. The three most important settings are at the top.
Package KnowWE-Resources#
Right click 'KnowWE-Resources' project -> Run as -> Maven packageCreate a run configuration for building the wiki#
Right click on "KnowWE-App", select Run as -> Maven build….A dialog will show. Set the following settings:
Goals: clean install
Profiles: local core-plugins
Enable checkbox "Resolve Workspace artifacts"
Updating the Tomcat context#
Right click on "KnowWE-App" -> Tomcat project -> Refresh context in TomcatStarting KnowWE#
You can now start Tomcat using the Start tomcat toolbar button or menu entry. Open the following URI in your browser:Troubleshooting#
Compile errors after first build#
Sometimes you get errors like:Cannot nest output folder 'd3web-Distributed/target/classes' inside output folder 'd3web-Distributed'
If this happens, close and open all affected projects. Alternatively, you have to do the following steps:
- Remove the affected projects from the workspace without deleting them, by selecting 'Delete' from the context menu and unchecking the checkbox.
- Import the project back to the workspace:
- Menu: File->Import...
- General: Existing projects into workspace
- As root directory select the project directory itself, e.g. <workspacedir>\d3web-KnowWE\d3web-distributed.
- Select the project in the list.
- Click 'Finish'.
- Repeat step 2 for every project that was affected.
ClassCastException on startup#
You might encounter the following exception:java.lang.ClassCastException: org.apache.catalina.util.DefaultAnnotationProcessor cannot be cast to org.apache.AnnotationProcessorWorkaround: In the folder where you unpacked Tomcat (e.g. /usr/local/apache-tomcat-6.0.20/) you can find a directory called conf. In there is context.xml. Add follwing statement into the <Context> element: